Why Your Toilet Keeps Running
A toilet that runs continuously is almost never a mysterious plumbing failure - it is usually one of three things: a worn flapper, a misadjusted float, or a failing fill valve. Understanding which part does what makes diagnosing the problem straightforward.
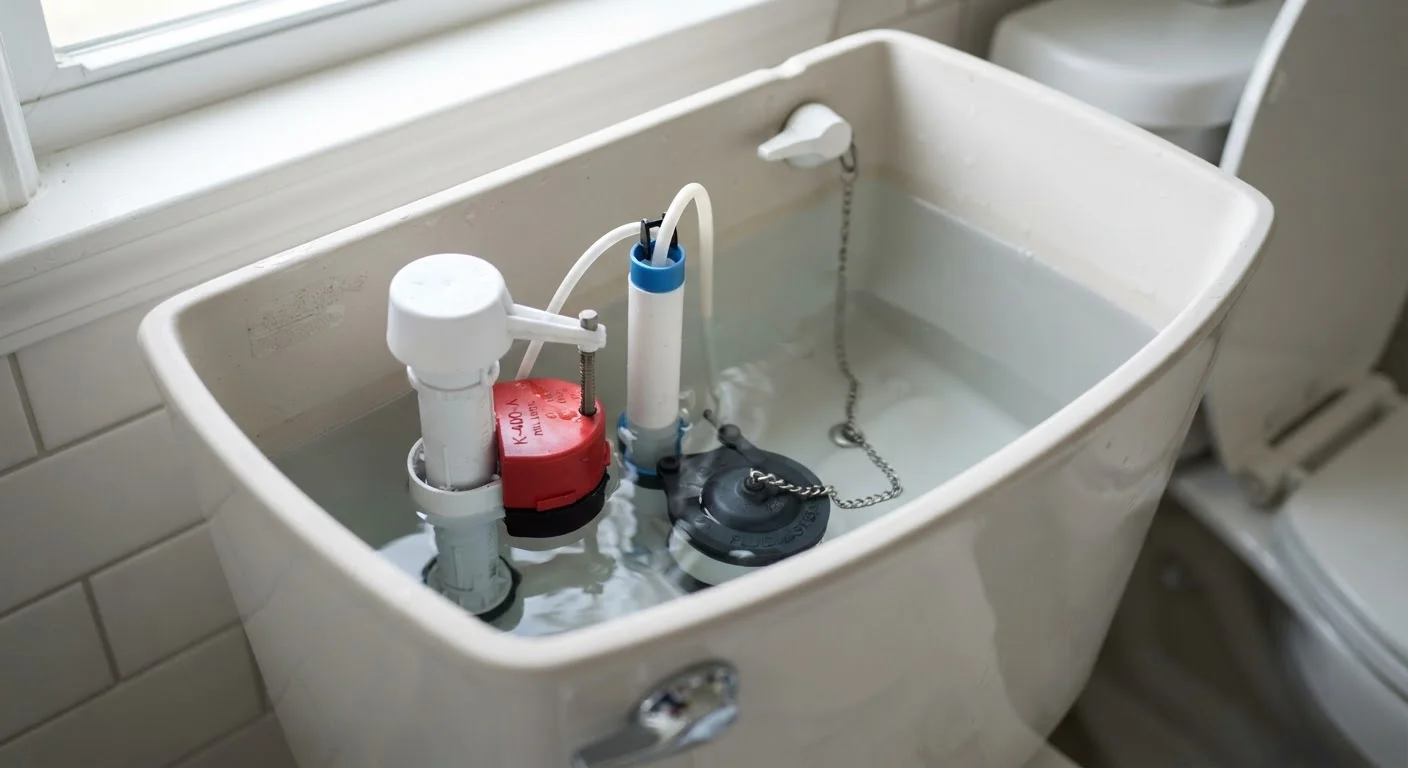
- Flapper: A rubber seal at the bottom of the tank that opens when you flush and closes to let the tank refill. Over time, the rubber warps or mineral deposits prevent a tight seal.
- Float: A buoyant device that rises with the water level and signals the fill valve to stop. If it is set too high, water spills into the overflow tube and the fill valve never shuts off.
- Fill valve: Controls the flow of water back into the tank after a flush. A worn fill valve may hiss or cycle on and off at intervals - sometimes called a phantom flush.
If you are considering a larger bathroom project, our complete bathroom renovation guide covers plumbing decisions in much greater depth.
What you will need
Tools and Parts You Will Need
You do not need a plumber's toolkit for this job. The items below cover nearly every running-toilet scenario, and most are available at any hardware store for a modest cost.
Adjustable wrench or pliers
Tightens or loosens the lock nut securing the fill valve to the tank.
Food coloring or dye tablet
Dropped into the tank to detect whether the flapper is leaking into the bowl.
Replacement flapper
Swaps out a worn or warped flapper that is failing to seal the tank.
Replacement fill valve
Replaces a fill valve that cycles on and off continuously or never fully shuts off.
Sponge and bucket
Removes residual water from the tank before replacing parts.
If you are unsure which parts to buy before diagnosing, start with diagnosis only (Steps 1-3) and purchase parts only after confirming the cause.
Step-by-Step: Diagnosing and Fixing the Problem
Work through these steps in order. Many readers find the fix during Step 2 or 3 and never need to go further.
Remove the tank lid and listen
Carefully lift the porcelain lid off the toilet tank and set it flat on a safe surface - tank lids break easily. Listen to the sound coming from inside. A hissing noise usually points to the fill valve; water trickling into the bowl suggests the flapper.
Test the flapper with food coloring
Add several drops of food coloring or a dye tablet to the tank water. Wait 10-15 minutes without flushing. Check the toilet bowl - if color appears, the flapper is not sealing properly and water is seeping through. This is the most common cause of a running toilet.
Check the float height
Look at the water level inside the tank. It should sit about one inch below the top of the overflow tube (the tall pipe in the center of the tank). If water is spilling over or near the top of the overflow tube, the float is set too high. On a ball-float style, bend the arm down slightly. On a cup-float (cylinder) style, slide the float down the fill valve shaft and lock it in place.
Shut off the water supply and flush
Turn the shut-off valve clockwise until it stops. Flush the toilet to drain the tank. Use a sponge and bucket to remove any remaining water before replacing parts. This keeps your work area dry and prevents accidental spills.
Replace the flapper if it is worn
Unhook the old flapper from the pegs on either side of the overflow tube and disconnect the chain from the flush handle arm. Take the old flapper to the hardware store to match the size, or look up your toilet model number (stamped inside the tank) to find a compatible part. Snap the new flapper onto the pegs and reconnect the chain, leaving about half an inch of slack.
Replace the fill valve if hissing persists
If adjusting the float didn't stop the hissing, replace the entire fill valve. Unscrew the lock nut beneath the tank with an adjustable wrench, pull out the old valve, and slide in the new one. Follow the manufacturer's instructions to set the water-level height before tightening. Reconnect the supply line and turn the water back on slowly.
Restore water and verify the fix
Turn the shut-off valve counterclockwise to restore water. Let the tank fill completely, then flush once. Watch and listen for 5 minutes - the tank should fill, reach the marked water level, and go completely silent. Repeat the dye test if you want extra confirmation the flapper seal is holding.
Match Parts to Your Toilet Model
Toilet flappers and fill valves are not universally interchangeable. Check the model number stamped inside the tank or on the base of the toilet before buying parts. Bringing the old part to the hardware store is a reliable way to find a match and avoid a second trip.
Know When to Call a Professional
Most toilet repairs described here are safe DIY tasks. However, if you discover a cracked tank, corroded supply lines, water pooling at the base of the toilet, or a shut-off valve that will not turn, stop work and contact a licensed plumber. These issues go beyond a simple internal repair and can cause water damage if handled incorrectly.
Keeping Your Toilet Running Smoothly
Once your toilet is quiet again, a small amount of periodic attention can prevent the problem from returning. Every six to twelve months, lift the tank lid and check the flapper for mineral buildup or visible warping, and confirm the water level is sitting about an inch below the overflow tube.
Running Toilets Waste More Than You Think
A continuously running toilet can waste 200 gallons or more of water per day, according to water utility estimates. Beyond the environmental impact, this quietly inflates your water bill every month. Addressing the problem promptly is both a practical and responsible choice.
Hard water accelerates wear on rubber parts. If your home has hard water, consider replacing the flapper annually as a precaution - the part typically costs just a few dollars. The same mindfulness about waste applies in the garden: our guide on watering your plants correctly can help you cut down on unnecessary water use outdoors as well.